In summary:
- Mastering Vancouver photography requires knowing its unwritten rules on timing, etiquette, and hyper-local locations.
- Legal street photography is possible for personal or artistic use, but understanding BC’s Privacy Act and the line between personal and commercial work is critical.
- The most compelling shots—be it light trails, sunsets, or reflections—rely on insider knowledge of specific spots and atmospheric timing, not just expensive gear.
You’ve seen the iconic images: the glowing sails of Canada Place, the misty silhouette of the Lions Gate Bridge, the vibrant neon of Gastown. You arrive in Vancouver, camera in hand, ready to capture its unique blend of urban energy and natural grandeur. Yet, so often, the photos you bring home feel… generic. They lack the soul and the specific mood of the city, looking more like stock images than personal, artistic captures. The standard advice to “use a tripod” or “shoot at golden hour” only gets you so far in a city with its own distinct rhythm and rules.
This guide is built on a different premise. What if the key to unlocking Vancouver’s photographic potential wasn’t in your camera bag, but in your understanding of the city itself? The true masters of urban photography here don’t just know their camera settings; they know the unwritten rules. They know why you never visit the Steam Clock at noon on a Saturday, why the best sunset colour at English Bay appears 20 minutes *after* the sun has vanished, and how to legally photograph strangers on Water Street. They understand the city’s unique etiquette, its specific legal nuances, and its hyper-local secrets.
Forget the generic tips. This is your workshop leader’s guide to situational photography in Vancouver. We will move beyond the technical basics and dive into the hyper-local knowledge that separates a tourist snapshot from a professional, atmospheric shot. We’ll explore the precise locations for the best light trails, the legalities of street photography, the hidden spots for stunning reflections, and the artistic techniques to capture that quintessential West Coast look. By the end, you won’t just know how to operate your camera in Vancouver; you’ll know how to see the city like a local photographer.
This article provides a structured roadmap to mastering Vancouver’s most iconic and hidden photographic opportunities. The table of contents below outlines the specific “unwritten rules” and insider secrets we will cover, giving you the knowledge to approach the city with confidence and creativity.
Summary: Vancouver Night & Urban Photography: A Guide to the City’s Unwritten Rules
- The Car Trails: Where Is the Best Overpass for Traffic Light Streaks?
- Tripod Etiquette: Can You Use a Tripod inside Granville Island Market?
- The Privacy Law: Is It Legal to Photograph Strangers in Vancouver?
- The Puddle Hunter: How to Find Reflection Shots in Gastown?
- The “Vancouver Blue”: How to Color Grade Your Photos for the West Coast Look?
- Why You Should Never Visit the Steam Clock at Noon on a Saturday?
- Why Sunset at English Bay Happens Later Than You Think in June?
- Vancouver Lookout vs Cypress Mountain: Which View Is Worth the Drive?
The Car Trails: Where Is the Best Overpass for Traffic Light Streaks?
Capturing the kinetic energy of a city through light trails is a quintessential night photography project. In Vancouver, the goal isn’t just to find any traffic, but to frame it against an iconic backdrop. While many overpasses offer a view, the Cambie Street Bridge provides an unparalleled composition, especially looking south. Its gentle S-curve creates elegant, flowing lines of red and white, a far more dynamic result than a simple straight road. This is where hyper-local knowledge elevates a technical exercise into an art form.
The magic of this location is the layering of motion. As the image above demonstrates, you can capture not only the S-curve of car traffic but also the bright streak of the Canada Line SkyTrain passing underneath. This adds a powerful second element and a distinctly Vancouver flavour to your shot. To achieve this, you need more than just the right settings; you need patience and timing, waiting for all the elements to align perfectly. Mastering this shot is a rite of passage for local photographers.
To turn this vision into reality, follow this proven formula:
- Step 1: Set your camera to Manual mode and mount it securely on a tripod to eliminate any camera shake during long exposures.
- Step 2: Configure your ISO to 100 for crisp, noise-free images and set a narrow aperture (f/8 to f/11) for deep focus across the scene.
- Step 3: Use a shutter speed between 10-30 seconds depending on traffic flow—longer exposures create extended light trails while shorter ones capture individual vehicle movements.
- Step 4: Time your shots with the Canada Line SkyTrain passing underneath bridges like Cambie Street Bridge for multi-layered light trail effects.
- Step 5: Position yourself to capture traffic flow with iconic Vancouver backdrops like BC Place’s glowing roof or the downtown skyline from North Vancouver overpasses near Lonsdale.
Tripod Etiquette: Can You Use a Tripod inside Granville Island Market?
Granville Island, with its bustling market, artisan workshops, and waterfront views, is a photographer’s paradise. Inside the Public Market, the vibrant colours of produce and the energy of the crowds are incredibly photogenic. The immediate impulse for any serious photographer in this low-light, high-action environment is to set up a tripod for a sharp, well-composed shot. This is the first test of your “unwritten rules” knowledge. The direct answer is a clear “no.”
This isn’t just a suggestion; it’s official policy. As the Granville Island administration explicitly states in their official filming guidelines, “Tripods may not be used in an area that it may cause a tripping hazard, this includes the Public Market, busy thoroughfares, docks and boardwalks.” This rule is born from practicality and safety. The market is a high-traffic pedestrian zone, and a tripod, no matter how carefully placed, becomes an obstacle and a liability. Acknowledging and respecting this rule is the first step to shooting like a pro, not a disruptive tourist.
So, how do you get the shot? You adapt. This limitation forces you to be more creative and master no-tripod techniques. This is where a workshop leader would challenge you to leave the bulky gear behind and rely on skill. Embrace a more flexible toolkit and mindset.
Action Plan: The Pre-Shoot Audit for Restricted Spaces
- Points of contact: Before arriving, check the venue’s official website for filming policies and look for posted signs upon entry. Note the presence and location of security staff.
- Collect: Inventory your low-profile gear. This includes a flexible GorillaPod, a fast f/1.8 or f/1.4 prime lens for low light, and a secure camera wrist strap.
- Coherence: Confront your plan with the venue’s primary purpose. Is your goal (a static, long exposure) compatible with a busy market designed for fluid movement?
- Memorability/emotion: Can you capture the market’s essence without a tripod? Focus on handheld shots of vendor interactions, detailed textures, or creative motion blur.
- Plan d’intégration : Identify tripod-friendly zones nearby, like the exterior docks facing the Burrard Bridge, to use before or after entering the restricted market interior.
Instead of fighting the rules, use them as a creative constraint. The “No-Tripod Photography Toolkit” below offers practical alternatives that not only comply with market etiquette but can also lead to more dynamic and interesting photographs.
- Technique 1: Use a flexible GorillaPod wrapped around market bins, railings, or structural pillars to stabilize your camera without blocking pedestrian flow.
- Technique 2: Master the ‘human tripod’ stance by bracing yourself against a solid pillar or wall, tucking your elbows tight to your body, and using controlled breathing to minimize shake.
- Technique 3: Leverage modern camera high ISO performance (ISO 1600-3200) combined with image stabilization to shoot handheld with faster shutter speeds in the market’s ambient light.
- Technique 4: Arrive 30 minutes before the market’s 9 AM opening time to capture vendors setting up, when tripod use is more tolerated and crowds are minimal.
- Technique 5: Focus on Granville Island’s tripod-friendly exterior zones like the pier facing Burrard Bridge or the docks with False Creek Ferry views for unrestricted shooting.
The Privacy Law: Is It Legal to Photograph Strangers in Vancouver?
Street photography is the art of capturing candid moments of public life. Vancouver’s diverse neighbourhoods, from the historic streets of Gastown to the bustling sidewalks of Robson Street, offer a rich canvas. However, many amateur photographers are hesitant, worried about the legality and ethics of photographing strangers. This is a critical “unwritten rule” to understand, and the answer is nuanced. Generally speaking, in Canada, you have the right to photograph in public spaces, as there is no reasonable expectation of privacy.
The legal foundation in British Columbia rests on a principle of reasonableness. The province’s privacy legislation is guided by a principle of what is ‘reasonable in the circumstances’ under the BC Privacy Act. In a public square or on a busy street, the expectation of privacy is low. However, the legality of your photograph depends heavily on its intended use. This is the most crucial distinction a photographer must make: are you shooting for personal/artistic expression, or for commercial purposes?
For artists, hobbyists, and journalists, the freedom to capture public life is broadly protected. But the moment a photograph is used to sell or endorse a product or service, the rules change dramatically. An identifiable person’s image cannot be used for commercial gain without their explicit, written consent via a model release. The table below breaks down these critical distinctions.
| Photography Type | Legal Status in Public Spaces (BC) | Consent Required? | Model Release Needed? |
|---|---|---|---|
| Personal/Artistic Use | Legal – no expectation of privacy in public | No | No |
| Editorial/Journalistic | Legal – protected under Section 2B Charter | No | No |
| Commercial/Advertising | Illegal without consent if subject is identifiable | Yes – explicit | Yes – required |
| Group/Crowd Photos | Legal if no individual is emphasized or identified by name | No | No |
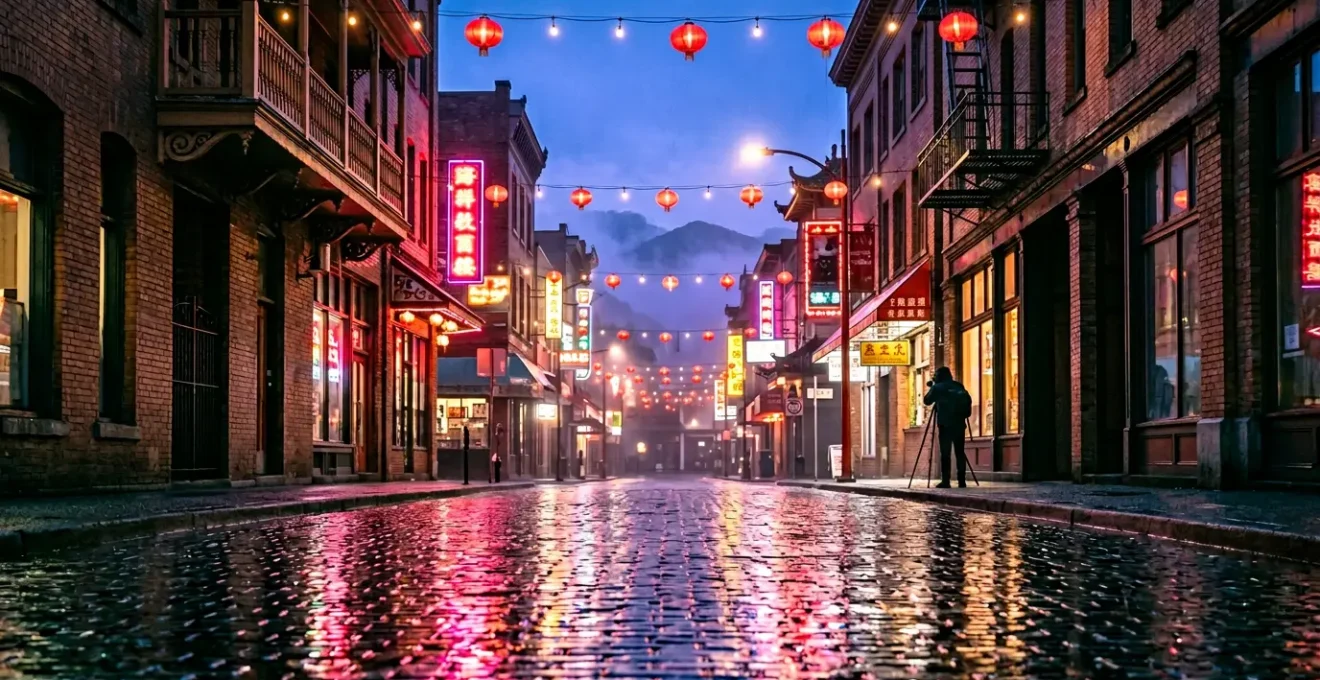
The Puddle Hunter: How to Find Reflection Shots in Gastown?
Vancouver is famous for its rain, a fact that often frustrates tourists but delights photographers. That “liquid sunshine” transforms the city, creating reflective surfaces that turn ordinary scenes into magical, symmetrical compositions. Gastown, with its historic cobblestone streets, vintage architecture, and vibrant neon signs, is the epicentre for this type of photography, often called “puddlegramming.” The challenge isn’t waiting for rain, but knowing exactly where the best, most photogenic puddles form.
This is hyper-local knowledge at its finest. Not all puddles are created equal. You’re looking for large, relatively still pools in locations where the reflection will capture an iconic element, like the Steam Clock or a classic neon sign. The uneven, historic cobblestones of areas like Blood Alley Square are perfect for this, as they create shallow but wide puddles that beautifully mirror the brick facades and overhead string lights. The key is to get your camera lens as close to the water’s surface as possible to maximize the reflection and create a sense of immersion.
While luck and a recent downpour are your best friends, a truly dedicated puddle hunter knows a few tricks to manufacture their own luck. However, this level of intervention comes with a critical responsibility to respect the historic and public nature of Gastown. As a photography workshop leader, I must stress that safety and etiquette are paramount, especially when shooting after dark in urban environments.
Gastown offers a vibrant historic vibe and is safe during daytime for exploring shops and eateries, but caution increases at night due to its edge bordering the troubled Downtown Eastside.
– Vancouver Planner Safety Analysis, Is Vancouver Safe for Tourists: Analysis by Area (2026)
This context is vital. While hunting for that perfect shot, remain aware, stay in well-lit core areas, and ideally, shoot with a partner. The following guide provides specific, tested locations and techniques for your Gastown puddle hunt.
- Location 1: Blood Alley Square – The historic cobblestones here create large, shallow puddles after rainfall that perfectly reflect the vintage brick architecture and overhead string lights.
- Location 2: Water Street & Abbott Street corner – This intersection’s uneven stones collect photogenic puddles ideal for capturing the Steam Clock’s reflection with neon signage in the background.
- Location 3: Powell Street & Columbia Street area – Less crowded than main Gastown, this zone offers privacy for puddle shots with the same characteristic brick buildings and street lamps.
- Pro Technique: Bring a water bottle to create a controlled puddle on flat cobblestone for the perfect Steam Clock or neon sign reflection—do this discreetly and wipe up afterward to respect the area.
- Safety Protocol: Shoot in pairs after dark, stay in well-lit areas like Water Street’s core tourist blocks, and avoid poorly lit alleys eastward toward Hastings where foot traffic drops significantly.
The “Vancouver Blue”: How to Color Grade Your Photos for the West Coast Look?
Beyond composition and technique, great urban photography captures a city’s mood. In Vancouver, this mood is often defined by a specific colour palette, an aesthetic locals might call the “Vancouver Blue.” It’s not just one colour, but a sophisticated interplay of cool, atmospheric tones that defines the Pacific Northwest look. It’s the deep, desaturated blue of a twilight sky over the ocean, the cyan-teal of the water itself, and the rich, damp greens of the surrounding rainforest that permeates the city’s air.
Capturing this look is less about in-camera settings and more about a deliberate artistic choice in post-processing. It’s about resisting the urge to push for vibrant, over-saturated colours and instead embracing a more subtle, cinematic and often melancholic feel. The goal is to make your photos *feel* like Vancouver on a classic overcast or misty day, even if you shot them in sunshine. This requires a nuanced approach to colour grading, where you guide the tones in your image toward this specific palette.
As the palette above illustrates, the key is the relationship between colours. Notice the transition from the cool blues of the sky to the greenish-cyans of the water, anchored by the deep forest greens. To replicate this in your photos, start by shooting in RAW to retain maximum colour information. In your editing software (like Lightroom or Capture One), focus on these adjustments:
- White Balance: Nudge the temperature slightly cooler (towards blue) to enhance the atmospheric feel.
- HSL/Color Mixer: This is your primary tool. Select the Blues and slightly decrease their saturation while shifting the hue towards cyan. Select the Greens and deepen them, perhaps shifting their hue slightly towards blue.
- Split Toning/Color Grading: A powerful technique. Introduce a subtle blue or teal tone into the shadows of your image, and a very light, complementary warm tone (pale yellow or orange) into the highlights to mimic the effect of city lights on a misty evening.
- Clarity & Dehaze: Use these sparingly. The Vancouver look is often soft and atmospheric, not hyper-sharp. A slight reduction in clarity or a negative dehaze can sometimes enhance the misty, moody quality.
Why You Should Never Visit the Steam Clock at Noon on a Saturday?
The Gastown Steam Clock is arguably Vancouver’s most photographed landmark after the Canada Place sails. Every tourist’s itinerary includes it, and at noon on a Saturday, it feels like all of them are there at once. For a photographer, this is the worst-case scenario. The combination of harsh, overhead midday light and overwhelming crowds makes it virtually impossible to get a clean, well-lit, or creative shot. The light flattens the clock’s texture, and your frame will be filled with wandering tourists, selfie sticks, and other distractions.
This isn’t just an opinion; it’s a core principle for professionals who make their living photographing the city. They understand that the “when” is just as important as the “what.” Avoiding peak times is the first and most important unwritten rule of photographing popular landmarks.
Gastown Steam Clock Photography Tour: Optimal Timing Case Study
Professional photography tours in Gastown specifically avoid midday Saturday sessions due to ‘peak tourist crowds making it impossible to get a clean shot.’ Tour operators schedule sessions at twilight (beginning around 7-8 PM on weekday evenings) when the Steam Clock’s lights are illuminated against a deep blue sky and crowds have dissipated. Participants report that this timing allows unobstructed compositions of the clock with its steam visible against the twilight atmosphere, combined with the golden glow of street lamps. The tour case demonstrates that Tuesday-Thursday evenings at 8 PM consistently provide optimal conditions: minimal pedestrian traffic, active clock lighting, and the ability to use long exposure techniques without crowd interference.
The case study makes it clear: the solution is to think like a local, not a tourist. Instead of fighting the crowds, choose a time when you have the city to yourself. As professional photographer Will Pursell notes, the best opportunities are often at the edges of the day.
Early mornings provide empty streets and soft light. The district’s urban grit and historic details provide endless creative possibilities.
– Will Pursell, City Vibes: 15+ Must-See Urban Photoshoot Spots in Vancouver
Imagine the scene: a quiet, empty Water Street at dawn. The cobblestones are damp, the street lamps are still glowing, and you have the entire iconic landmark to yourself. This is the shot that tells a story—a far cry from the chaotic snapshot of a Saturday afternoon.
Why Sunset at English Bay Happens Later Than You Think in June?
Photographing the sunset at English Bay is a quintessential Vancouver experience. In summer, hundreds of people gather on the beach to watch the sun dip below the horizon. Most photographers pack up their gear the moment the sun disappears, believing the show is over. This is a rookie mistake and a perfect example of an “unwritten rule” that separates the insiders from the crowd. The real magic, the most photographically rich moment, happens *after* the sun is gone.
The first secret is understanding Vancouver’s specific geography. Due to the mountains of Vancouver Island and the Olympic Peninsula to the west, the sun often disappears behind a mountain peak 20-30 minutes before the official, astronomical sunset time. If you’re only tracking the official time, you’ve already missed the “sunstar on the horizon” shot. You need an app like PhotoPills or The Photographer’s Ephemeris to track the sun’s actual path over the mountains.
The second, more important secret is the “afterglow.” This is the period 15-25 minutes *after* the official sunset time. The sun, now well below the horizon, illuminates the undersides of high-altitude clouds, painting them in intense shades of pink, orange, and magenta. This is the colour and drama that most people miss by leaving too early.
English Bay Sunset Timing: Mountain Shadow Effect Analysis
Professional photographers documenting English Bay have identified a consistent timing phenomenon during summer months. While official sunset times in June might indicate 9:15 PM, the sun actually disappears behind the mountains of Vancouver Island or the Olympic Peninsula approximately 20-30 minutes earlier, around 8:45 PM. However, the most dramatic photographic opportunity—the ‘afterglow’ phase—occurs 15-25 minutes after the official sunset time (approximately 9:30-9:40 PM) when light reflects off high clouds, creating the intense golden-to-pink color gradients characteristic of Pacific Northwest coastal sunsets. Photographers who leave at official sunset time consistently miss this peak color moment. The case study recommends using PhotoPills or The Photographer’s Ephemeris apps with augmented reality features to predict the exact sun path over English Bay’s specific mountain backdrop, ensuring photographers position themselves correctly and remain through the complete afterglow phase.
Key takeaways
- Local knowledge trumps expensive gear: Knowing the exact timing and location is more valuable than having the latest camera.
- Safety and legality are creative constraints, not barriers: Working within the rules forces you to be a more adaptable and creative photographer.
- The best light in Vancouver is often found before dawn or long after sunset, not just during the “golden hour.”
Vancouver Lookout vs Cypress Mountain: Which View Is Worth the Drive?
For the definitive, sweeping vista of Vancouver, photographers are often faced with a classic dilemma: ascend the Vancouver Lookout in the heart of downtown, or make the 30-minute drive up to the Cypress Mountain viewpoint? Both offer stunning panoramas, but they provide vastly different experiences and photographic opportunities. The “better” choice depends entirely on your artistic goal, your budget, and your tolerance for shooting through glass. This is not a question of which is “best,” but which is “best for the shot you want to create.”
The Vancouver Lookout offers a “context” view. You are inside the city, looking down at its architectural bones and the grid-like pattern of its streets. It’s perfect for abstract compositions, studying the flow of traffic, and capturing the city’s relationship with the immediate waterfront. Its main advantages are accessibility (no drive required) and weather protection. The primary disadvantage is a major one for photographers: you are shooting through thick, angled glass, which means fighting reflections is a constant battle. A good polarizing filter is not just recommended; it’s essential.
The Cypress Mountain Viewpoint, on the other hand, offers a “grandeur” view. It places the entire downtown peninsula within the vast context of the surrounding nature—Stanley Park, the Burrard Inlet, and the distant mountains. This is where you go for the epic, portfolio-worthy landscape shot that tells the story of a city nestled in nature. The viewpoint is free and offers an unobstructed, open-air perspective. The trade-offs are the required drive and its dependency on clear road conditions, especially outside of summer. A wide-angle lens is a must to capture the full scale of the scene.
To help you make an informed decision based on your photographic needs, this analysis from Destination Vancouver’s guide to top photo spots can be summarized in the following breakdown:
| Factor | Vancouver Lookout | Cypress Mountain Viewpoint |
|---|---|---|
| Cost | $18 admission fee | Free (viewpoint access) |
| Travel Time | Downtown location – no drive needed | 30-minute drive from downtown |
| Accessibility | Elevator access – all weather | Road conditions dependent – closed in heavy snow |
| Photography Type | Top-down cityscape through glass – compositional study | Open-air panoramic – epic portfolio shots |
| Shooting Limitations | Shoot through tilted glass windows – reflections possible | Unobstructed 360° views – no glass barriers |
| View Perspective | ‘Context’ view – inside the city looking at architecture | ‘Grandeur’ view – city within natural setting, mountains, Lions Gate Bridge, Burrard Inlet visible |
| Best For | Beginners, architectural details, street grid patterns, weather protection | Experienced photographers, panoramic landscapes, nature-city blend storytelling |
| Equipment Needs | Standard lens sufficient, polarizing filter recommended for glass | Wide-angle lens essential, tripod recommended for low-light |
Now that you’re armed with the unwritten rules, the insider secrets, and the hyper-local knowledge, the city is yours to capture. The next step isn’t to buy more gear; it’s to go out and apply these principles. Pick a location from this guide, choose the optimal time, and shoot with intention. Transform your photography from generic to genuinely Vancouver.