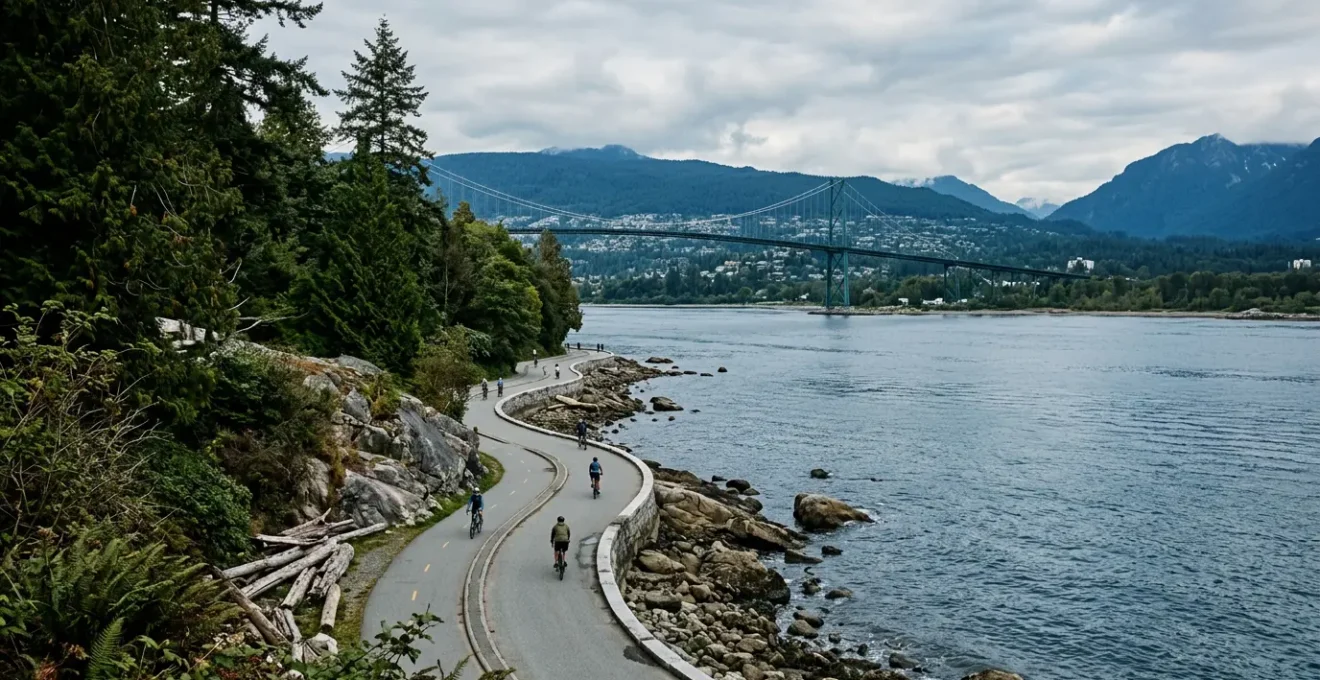
The beautiful Vancouver Seawall ride can quickly turn into an expensive headache of fines, overage fees, and theft if you’re not prepared.
- The Stanley Park Seawall bike path is strictly one-way (counter-clockwise), and a helmet is mandatory everywhere in BC.
- Bike share systems can be costly for long rides, and bike theft is a real risk without a proper locking technique.
Recommendation: Treat this guide as your pre-ride safety briefing to understand local rules, avoid common tourist traps, and ensure your Vancouver cycling experience is memorable for the right reasons.
Every day, I see tourists arriving at my bike shop with a picture-perfect image in their minds: a leisurely cycle around the world-famous Stanley Park Seawall, with stunning ocean views and a fresh sea breeze. It’s an incredible experience, and it’s one you should absolutely have. But what those pictures don’t show are the specific, strictly-enforced rules that can turn that dream ride into a day of frustration and unexpected expenses. As a local who helps hundreds of visitors a week, I want to give you the advice I give my customers — the real, practical tips you need to navigate Vancouver’s cycling culture safely and affordably.
Many visitors assume you can just hop on a bike and go, but they quickly learn about the non-negotiable one-way direction of the Seawall path, the mandatory helmet law, and the clever ways bike thieves operate in a busy downtown core. This isn’t about scaring you; it’s about preparing you. Think of this as the essential briefing from a local who wants you to have a fantastic, problem-free day on two wheels. We’ll cover the common pitfalls, from confusing bike-share pricing to hyper-local hazards you’d never think of, so you can focus on the views, not the rulebook.
This guide breaks down the essential local knowledge you need to cycle Vancouver like a pro, not a first-timer. Here’s a look at the insider tips we’ll cover to keep you safe and save you money.
Summary: Stanley Park Seawall: How to Ride the One-Way Path Without Getting Fined?
- Mobi Bike Share: Why the 30-Minute Limit Confuses Most Tourists?
- The False Creek Loop: Is It Easier Than the Stanley Park Seawall?
- The “Vancouver Lock”: How to Secure Your Bike in Downtown to Prevent Theft?
- E-Bike or Hybrid: Which Is Necessary for Riding to Spanish Banks?
- Ticket Risk: Do You Really Need to Wear a Helmet on the Seawall?
- The “Bone Shaker”: Why Cyclists Should Avoid Water Street?
- The Slippery Sidewalk: Why Are Wet Cherry Petals Dangerous for Cyclists?
- Is the SeaBus Just a Commuter Ferry or a Cheap Sightseeing Cruise?
Mobi Bike Share: Why the 30-Minute Limit Confuses Most Tourists?
The Mobi bike-share system seems like a great deal, especially with its stations conveniently located near the park entrance. Tourists see the “24-hour pass” and think they’re set for a day of exploring. This is the first and most common tourist trap. The pass gives you unlimited rides, but each individual ride has a 30-minute time limit. The Stanley Park Seawall loop takes an average cyclist about 60-90 minutes. If you don’t dock the bike and check it out again within that 30-minute window, you start incurring expensive overage fees.
According to the City of Vancouver’s official Mobi rates, a 24-hour pass costs about $12, but the overage is $0.29 per minute. A 90-minute Seawall ride can end up costing you over $29 on a Mobi bike, far more than a half-day rental from a private shop. These bikes are also heavy, one-size-fits-all cruisers, not ideal for some of the park’s terrain. For short, one-way trips across downtown, Mobi is fantastic. For the Seawall, it’s a budget trap unless you master the “Mobi-Swap” strategy.
| Option | 90-Minute Stanley Park Ride Cost | 4-Hour Exploration Cost | Bike Quality |
|---|---|---|---|
| Mobi 24h Pass (overage) | ~$12 + $17.40 overage = $29.40 | ~$12 + $62.10 overage = $74.10 | Heavy, one-size, basic |
| Private Rental (e.g., Cycle City) | Included in half-day rate | ~$25-35 half-day | Lightweight, sized, upgraded |
If you’re committed to using Mobi, you have to ride like a local on a mission. Here is the only way to do it without racking up fees:
- Step 1: Start at the Denman & Georgia Mobi station. Before you even unlock a bike, use the Transit App to check for available docks at your target mid-point station in the park.
- Step 2: Ride the Seawall counter-clockwise for about 25 minutes. This should get you near the Prospect Point area.
- Step 3: Dock your bike at the Mobi station you identified. You must see the green light to confirm the ride has ended.
- Step 4: Immediately check out a new bike. This resets your 30-minute timer.
- Step 5: Finish the loop. Be warned: on sunny days, stations can be completely full, leaving you unable to dock your bike and running up your time. Always have a backup station in mind.
The False Creek Loop: Is It Easier Than the Stanley Park Seawall?
While Stanley Park gets all the fame, many locals prefer the False Creek loop. For a casual cyclist or family, it’s often a better choice. The entire route is completely flat, with zero elevation gain, unlike the one significant hill on the Stanley Park route near Prospect Point. It’s also generally less crowded with tourists, offering a more relaxed and wider path in most areas. While the Seawall has strict one-way paths, much of the False Creek route is bidirectional, offering more flexibility.
The scenery is different but just as compelling. Instead of rainforest and ocean vistas, you get a stunning urban waterfront experience, with views of the downtown skyline, Science World’s iconic dome, and the vibrant Granville Island Market. The ability to stop at Granville Island for lunch is a major highlight that the Seawall can’t offer.
| Factor | Stanley Park Seawall | False Creek Loop |
|---|---|---|
| Difficulty (Terrain) | Mostly flat; one hill section near Prospect Point | Completely flat; no elevation gain |
| Crowd Factor | Very high tourist density in summer; can be narrow | Moderate; locals and tourists mixed |
| Rule Complexity | Strict one-way counterclockwise; separate bike/pedestrian paths | Bidirectional in most sections; shared paths in some areas |
| Distance | ~9-10 km loop | ~12 km full loop |
| Scenery | Dramatic ocean views, rainforest, Lions Gate Bridge, mountains | Urban skyline, harbourfront, Science World, Granville Island Market |
| Unique Features | Siwash Rock, Brockton Point Lighthouse, totem poles | Aquabus/False Creek Ferries for route flexibility; Granville Island stop |
The most unique feature of the False Creek loop is the ability to “route-multiply” using the mini ferry services like the Aquabus or False Creek Ferries. If you get tired or want to cut across the water, you can simply roll your bike onto one of these tiny boats for a few dollars. This flexibility is a game-changer for casual riders.
This small convenience transforms the ride, allowing you to customize your distance and itinerary on the fly. It’s a perfect example of how Vancouver integrates its transit with its cycling network, something the more isolated Stanley Park loop doesn’t offer.
The “Vancouver Lock”: How to Secure Your Bike in Downtown to Prevent Theft?
Riding is only half the story. The moment you stop to grab a coffee or explore a shop, your rental bike becomes a target. Bike theft is a serious issue in Vancouver, but it’s also a largely preventable one if you know the local method. The good news is that thanks to programs like Project 529, there has been a 66% reduction in bike thefts since 2015. This shows that the system works when people use it correctly. Relying on a flimsy cable lock you’d use in a small town is a recipe for a long walk back to the rental shop and a hefty replacement fee.
Securing your bike here is a ritual we call the “Vancouver Lock-Up.” It requires the right equipment and the right technique, every single time. A U-lock is the absolute minimum. Anything less is an open invitation. Most professional thieves can cut a cable lock in seconds.
When you rent a bike, make sure it comes with a quality U-lock and ask the shop to show you the proper technique. Don’t be shy; we expect you to ask. It shows you’re a smart rider. Your goal is to make your bike more difficult to steal than the one next to it. Here’s how you do it properly.
Your Action Plan: The Vancouver Lock-Up Checklist
- Equipment Check: Insist on a high-quality U-lock or a U-lock and cable combination. Never accept just a cable lock.
- Secure the Core: The primary goal is to secure the bike frame and the rear wheel (the most expensive part) to an immovable object like a city bike rack.
- Front Wheel Strategy: Use the U-lock to capture the rear wheel, the frame, and the bike rack all together. If you have a cable, loop it through the front wheel and connect it to the U-lock.
- Location is Key: Always lock your bike in a well-lit, high-traffic area. Avoid isolated spots, especially overnight or in areas like the Granville Entertainment District.
- Deterrent Decal: If you’re here for a while, register your bike with Project 529. The visible, tamper-resistant sticker is a known deterrent to thieves.
E-Bike or Hybrid: Which Is Necessary for Riding to Spanish Banks?
Many tourists want to explore beyond Stanley Park and head towards the beautiful beaches of Kitsilano and Spanish Banks. It’s a fantastic ride, but it contains a challenge that often surprises visitors: the hills. While Vancouver is a coastal city, the routes to its western beaches involve some significant climbs, especially along Point Grey Road. For a casual cyclist on a standard hybrid bike, this section can be a grueling, sweat-drenched workout that saps all the fun out of the day.
This is where an e-bike is not a luxury, but a necessity for enjoyment. The data shows locals and tourists have embraced them; there have been over 1.1 million e-bike rides since 2022 on the Mobi system alone, nearly double the usage of classic bikes. Why? Because they are hill-flatteners. They turn a tough climb into a gentle, manageable slope.
Case Study: The Point Grey Road Hill Challenge
The round trip from downtown to Spanish Banks is about 30-35 km. The make-or-break section is the sustained uphill grade along Point Grey Road. For a tourist not used to daily cycling, this hill on a hybrid bike is often the point where the ride stops being fun. With a pedal-assist e-bike, you maintain speed and momentum, arriving at the beach feeling refreshed and ready to explore, not exhausted and defeated. A Class 1 e-bike (the legal standard for rentals here) gives you assistance up to 32 km/h, and most rental models have a range of 40-60 km, easily covering the round trip on a single charge.
So, do you *need* an e-bike? If your plan is to stick to the flat loops of Stanley Park or False Creek, a hybrid is perfectly fine. But if your ambition is to conquer the ride to Spanish Banks and enjoy the stunning views without your legs giving out, then the answer is an emphatic yes. The extra rental cost is an investment in your enjoyment.
Ticket Risk: Do You Really Need to Wear a Helmet on the Seawall?
Let me be perfectly clear: yes. In British Columbia, it is the law for all cyclists of all ages to wear a helmet. This is not a suggestion or a guideline; it is a legal requirement under the Motor Vehicle Act. I see tourists all the time, especially from places where helmet laws are lax, who think it’s optional. They are the ones who get stopped by police and handed a ticket. It’s one of the most common fines issued to visiting cyclists.
The risk of getting a ticket is real. While police aren’t on every corner, they regularly patrol the Seawall and other major bike routes, especially on sunny days. The penalty might seem small, but it’s an annoying and entirely avoidable expense. According to British Columbia’s Motor Vehicle Act regulations, the maximum fine is $100, though it’s typically issued as a $29 ticket ($25 fine plus a $4 victim surcharge). That’s money you could have spent on a great post-ride meal.
More importantly, it’s about your safety. The Seawall is crowded, with cyclists of all skill levels, pedestrians, and rollerbladers. Accidents happen. A helmet is the single most important piece of safety equipment you can have. It’s not just about the law; it’s the local culture. You’ll notice that virtually every local cyclist wears one. Not wearing a helmet instantly marks you as a tourist and, frankly, as someone who isn’t taking safety seriously.
Any reputable rental shop will provide a helmet for free with your rental and will insist you take it. Make sure it fits properly: it should be snug, sit level on your head (not tilted back), and the chin strap should be securely fastened. It’s a simple, non-negotiable part of cycling in Vancouver.
The “Bone Shaker”: Why Cyclists Should Avoid Water Street?
A trip to Vancouver isn’t complete without visiting the historic Gastown district, with its beautiful Victorian architecture and the famous Steam Clock. Naturally, many tourists want to cycle right through the heart of it on Water Street. This is a mistake. We call that street the “Bone Shaker” for a reason. Those historic, charming cobblestones are a nightmare to ride on.
The uneven granite setts create intense vibrations that make controlling a bike difficult. When they’re wet, they become incredibly slippery, and your bike tires can easily get caught in the gaps between the stones, leading to a fall. It’s not just uncomfortable; it’s genuinely dangerous for an inexperienced rider. You risk losing control, damaging the bike, or injuring yourself. There is simply no reason to ride on the cobblestones themselves.
The local solution is simple: bypass it. You can still enjoy the beauty of Gastown without risking your safety. A protected, smooth, and separated bike lane runs parallel to Water Street, just one block away.
- The Problem: Water Street’s historic cobblestones are rough, slippery when wet, and can cause a cyclist to lose control.
- The Alternative: Use the dedicated, protected bike lane on West Cordova Street, which runs parallel one block south of Water Street.
- The Route: When heading east from downtown into Gastown, simply stay on the Cordova Street bike lane. It will take you safely past the main Gastown area.
- The Experience: Find a bike rack on Cordova or a side street, lock your bike up properly (using the Vancouver Lock-Up!), and then explore Gastown’s shops, galleries, and the Steam Clock on foot.
- The Local Tip: This allows you to experience the historic district safely and then get back on your bike on a smooth, fast route when you’re ready to leave.
The Slippery Sidewalk: Why Are Wet Cherry Petals Dangerous for Cyclists?
This is my favorite piece of insider advice because it’s something no tourist would ever anticipate. If you’re visiting in the spring (typically late March through April), you’ll be treated to one of the most beautiful sights in the city: our 43,000 cherry trees in full bloom. It’s spectacular. But for cyclists, it creates a unique and surprisingly treacherous hazard.
When the blossoms fall and mix with Vancouver’s frequent spring rain, they form a dense, pulp-like layer on the bike paths. This layer of wet, organic matter is as slippery as wet leaves or even ice. On a smooth, paved surface like a bike lane, this creates a situation with virtually zero traction. I’ve seen many experienced cyclists taken by surprise, their tires sliding out from under them on a corner or during a sudden stop.
Case Study: Vancouver’s Peak Petal Hazard Season
The danger is highest during and immediately after a spring shower in areas with a heavy canopy of cherry trees. High-risk zones for this phenomenon include the seawall around David Lam Park (which has 100 Akebono cherry trees), the residential streets of Kitsilano, the popular 10th Avenue bike route, and parts of Stanley Park near Lost Lagoon. The physics are simple: a smooth tire on a layer of wet, pulpy petals is like hydroplaning. Your grip on the road disappears instantly.
This doesn’t mean you should avoid cycling during cherry blossom season—far from it! It just means you need to practice “defensive cycling.” If you’re riding on a path covered in wet petals, you must:
- Reduce your speed significantly.
- Avoid sudden braking or sharp turns.
- Stay upright and centered on the bike when cornering.
- Give yourself extra distance to stop.
It’s a perfect example of a hyper-local condition that requires awareness. It’s the kind of knowledge that separates a prepared rider from one who’s in for a nasty surprise.
Key Takeaways
- The Stanley Park Seawall bike path is strictly one-way (counter-clockwise); follow the signs to avoid collisions and fines.
- A helmet is legally required for all ages in BC. It’s a non-negotiable rule with a real risk of a $29 ticket.
- Use a U-lock to secure the frame AND rear wheel to an immovable object. Cable locks are not sufficient for downtown Vancouver.
Is the SeaBus Just a Commuter Ferry or a Cheap Sightseeing Cruise?
For savvy cyclists, the SeaBus isn’t just a 12-minute ferry connecting downtown Vancouver to North Vancouver; it’s a powerful “route-multiplier.” It’s the key to unlocking some of the most epic and scenic rides the region has to offer, combining transit, sightseeing, and world-class cycling into one seamless, affordable adventure. This is the ultimate pro tip for turning a simple bike rental into an unforgettable experience.
Bikes are allowed on the SeaBus at no extra charge, and it runs frequently. For the price of a regular transit fare, you get a spectacular water-level view of the city skyline, the port, and the North Shore mountains. But the real magic happens when you disembark at Lonsdale Quay in North Vancouver. You are immediately connected to the North Shore Spirit Trail, another fantastic, car-free waterfront pathway.
This opens up an incredible loop that most tourists never even consider. You can ride from downtown, cruise across the harbor, explore the North Shore, and then ride back across the iconic Lions Gate Bridge into Stanley Park. It’s the best value “cruise” in the city, and it creates a cycling loop with unparalleled variety and views. It’s the perfect way to cap off your Vancouver cycling adventure.
- Step 1: Board the SeaBus at Waterfront Station downtown with your bike. Use a Compass Card or any tap-to-pay credit card.
- Step 2: Enjoy the 12-minute scenic crossing to Lonsdale Quay, positioning yourself in the designated bike area on the ferry.
- Step 3: In North Vancouver, roll off the ferry and directly onto the Spirit Trail, a protected waterfront bike path.
- Step 4: Ride the Spirit Trail west towards Ambleside Park, then follow the signs to connect to the bike path on the Lions Gate Bridge.
- Step 5: Cross the bridge (the views are breathtaking) and descend back into Stanley Park, completing a massive, epic loop that shows you the very best of the city for the cost of a transit ticket.
Now that you have the insider knowledge—from avoiding fines and fees to locking up properly and navigating local hazards—you’re ready to hit the pavement. Go have a fantastic, safe, and memorable ride.